Wednesday, September 11, 2019

NWN2: Importing a 3d model into the game: Part 3

So in Part 1 and Part 2 we converted a small object for placing ingame. What about an object where we want to allow creatures to walk on it, like the balconies of the stock game. We are going to add a walkmesh to the object. The walkmesh is not a required file for placeable objects (many stock game tables do not have them as an example).

A walkmesh tells the game very specifically where the player and creatures can and cant walk. I've made a copy of one of the stock game balconies to work with here. Here it is in gmax, it's object PLC_MC_BALCONY13.mdb.


Well we already have our object from Parts 1 and 2. so let's stop looking at everything that's not walkmesh and just focus on that for now. The picture below shows the important parts of the walkmesh. The model part must end in _w, NWN2 requires this. We've selected one polygon at left and under the surface properties at right we can see that the material is set so the game knows you can walk there, and also what footstep sound to make. Also, you can see the walkable part is marked with a different color than the non-walkable in gmax.


Here's an example walkmesh for download and import to use:  https://www.dropbox.com/s/uydar353lxggkp2/walkmesh_example.7z
It's a very basic square of "no walking here". You can import it into your kiwano model from Part 1 and 2 if you want.

More complicated shapes, such as the balcony, require more polygons in your walkmesh than I have included in my basic example, but the basic idea is the same. You will need to add polygons to get a shape you want.

Very basically, here is how you can do that in gmax.


Then add your triangle point by clicking somewhere


Then close the triangle, it's always triangles for this.


If you want that part to be walkable, select the triangle or triangles and set the triangles to a material ID telling the game you can walk there. For stairs or non-flat walking, adjust the triangles as needed. See the first screenshots from the balcony walkmesh for an example.


Once you're done, export the object and test it out ingame (remember to bake the area so it uses the walkmesh you just made).

NWN2: Importing a 3d model into the game: Part 2

In Part 1 (http://kamalpoe.blogspot.com/2019/09/nwn2-importing-3d-model-into-game-part-1.html ) we downloaded and converted an object from sktechfab into the .mdb format Neverwinter Nights 2 uses and converted our texture files to .dds. Now to make adjustments to the file and get it into the game.

As I said at the end of the previous part, for the rest of the process, I prefer to use gmax. You can do all the gmax things I am going to talk about in Part 2 of this tutorial in Blender if you prefer.

In gmax, select file -> import, and select the .mdb file we exported at the end of the previous part. I've also open the Material Navigator pane so we can see the textures assigned. As you can see, Blender left an extraneous triangle object in there, we can select it and delete it.
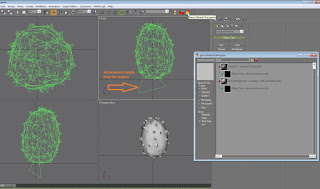


Remember from the past part where I said the model parts must be uniquely named, below is where you can do it in gmax, select the model (this model has only one part) and give it a unique name. Since the final object is going to be named PLC_var_food_02.mdb, I am going to name this model part PLC_var_food_02.
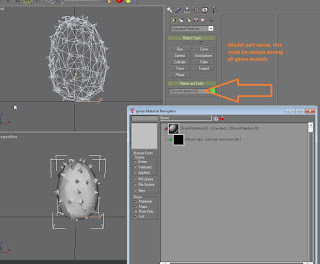


In the picture below, you can see I've named my model part, then used the Material Navigator to open the Material Editor pane. This pane is where we select the textures that will be applied to the model. Of the possible textures that can be applied, NWN2 can only use the Diffuse (this is the main texture), Self-Illumination (not needed, used if you want the object to glow), Filter (this is the tintmap), and Bump (this is the normal map). The rest are not used by the NWN2 game engine.
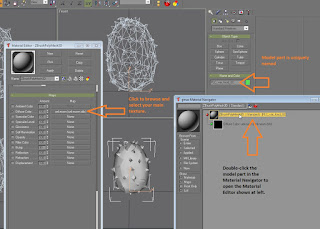


As we select the textures, the preview window shows them applied to the model. Your modelling program (whether gmax or Blender) knows how to wrap the texture around the object, as this information is included in the model file we downloaded. For purposes of this tutorial, no need to think about how it does it.
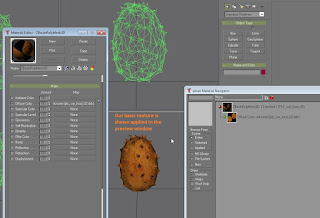


Note that how our Kiwano is oriented to the crossing lines in the viewports is how it's going to be centered ingame relative to the cursor when you try to place the object ingame. I'm not going to worry about that right now, let's just get the model ingame. Select File->Export and export it somewhere for the game to use and in the mdb format. I'm just using the Override folder here.

I've previously covered the 2da and blueprint editing process here:  https://kamalpoe.blogspot.com/2016/02/nwn2-basic-placeable-reskinning-tutorial.html It's exactly the same. Once that's done, copy the new model and textures into an area the game will use. For this tutorial I am just using an empty override and a test module.

If you're already familiar with placeables, you might have realized I left out some things, don't worry, that's on purpose for this tutorial.

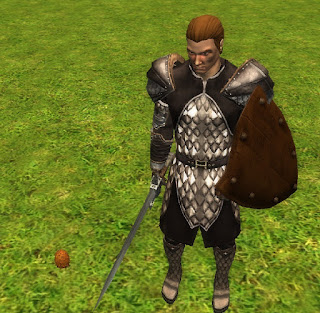
As you can see below, I've placed our kiwano ingame, with a stock human for scale. It's obviously way larger than I want, and also I can walk right through it! Let's fix that.
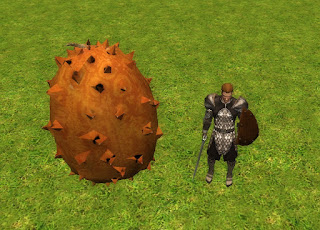


First, in the toolset, scale down your kiwano to the size you want it to actually be. Let's say 0.05, 0.05, 0.05 for our kiwano. Ok, now that it's the size you want your default kiwano to be, let's go back to gmax and make the kiwano that size.

Right click on the object and select scale.
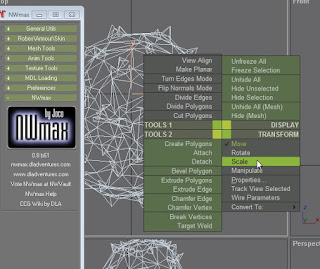


Next, select Tools ->Transformation type. Since you have already selected you are working with scale above, you get the Scale Transformation Type-In. While the NWN2 toolset uses a scale of 1 as default, gmax uses 100 as the default. So if you set your object in the toolset to 0.05 scale to get it scaled the way you want, you multiply that 0.05 times the 100 scale gmax uses, for a scale to enter in gmax of 5 for each dimension.
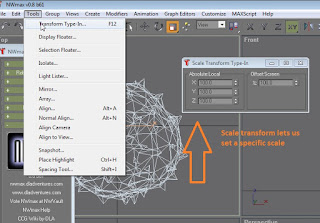


You can export your kiwano again, and when you place the object in NWN2 it should already be the size you want. But you can still walk through it.... Not really a problem for something meant to be a small fruit, but if you were putting a large statue ingame that's a problem.

Enter... the collision mesh. This is a model part that tells the game engine there is an object there, so creatures can't enter the space occupied by it. More about them is here: https://nwn2.fandom.com/wiki/MDB_Format  Anyway, you need one, and I've put an example one here:  https://www.dropbox.com/s/6z9bkdb66gy8yal/collision_mesh_for_tutorial.7z that you can download and use as an example. The example one is sized for a plate of pie. It's easier to import one than build a whole new one each time you need one.

You can also export a collision mesh from an existing object by opening the object in gmax, selecting the collision mesh, and then selecting File->Export Selected, this will export just what you've selected, not the entire object.

With your kiwano already open in gmax, select File -> Import and import your collision mesh. It doesn't replace the kiwano, just adds the new mesh object. Since my demo collision was from a pie, it's named based on that, change the name to the object you are working with, but it must have the _C3 or _C2 suffix (see the MDB documentation above for what the difference is). You need at least one of the two collision meshes.
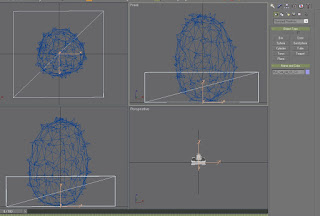


As you can see, it doesn't fit our kiwano very well, we need to fix that. Right click the collision box and select move, then select modify (under the arrow in the screenshot below) and the dots (highlighted in yellow below).
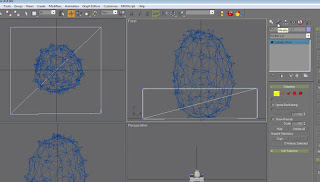


Select the dots in the viewbox, and move them around to better fir your object. Once you have a decent fit, you can export your object again and it's ready for game use. File->Export.
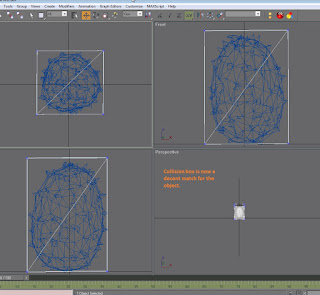


Our kiwano is small, too small to really affect the walmesh. What about larger objects? Part 3: adding a walkmesh.

NWN2: Importing a 3d model into the game: Part 1

For purposes of this tutorial I am going to use a 3d model from https://sketchfab.com. Sketchfab has lots of high quality models, often made from scanning real world objects, and the models they allow to be downloaded often use Creative Commons licensing. Their search function has a checkbox to restrict to downloadable models.

Specifically for this tutorial, I am using the Kiwano fruit from https://sketchfab.com/3d-models/kiwano-horned-melon-6ce07b8b2e654cde80eb5275842e5fe5

This tutorial assumes you have Blender, with the nwn2 .mdb import export scripts provided by rjshae from https://neverwintervault.org/project/nwn2/other/tool/blender-mdb-importexport-plugin . I personally also use gmax for fine tuning, so this tutorial will show that, but in principle the entire process can be done in Blender. gmax can be officially downloaded from https://www.turbosquid.com/gmax . To use gmax you will need the NWMax scripts from https://neverwintervault.org/project/nwn1/other/tool/nwmax-8. The download says it's for NWN1 but it works just fine for NWN2 as well.

Download the model. We always want to select the "original format", as the "autoconverted format" option produces a file in a format Blender and gmax can't handle. .obj and .fbx formats seem to be common, and those are good, Blender handles them without issues. Save your files somewhere. One peculiarity I've found is that the zip file you download often contains a zip file inside it with the model itself. This is the case with our example Kiwano, so you will need to extract the contents of that inside zip file.


We've extracted the contents now, here's what our folder looks like after I've placed all the files from the download into one folder for ease of use. There are two primary things to note here, the first is that there are more texture files than NWN2 can use. You will need the primary texture, and a normal map, plus a tintmap and a glowmap if you want tinting and for the object to glow, respectively.


Our Kiwano has both the main texture (highlighted in the image above, and a normal map included, the rest of the image files are files that NWN2 can't handle, so they can be deleted.

A word on filenames: Filenames need to be unique, otherwise NWN2 won't know for sure which file to use, and will just choose one. This will cause problems of course. I use the general naming convention of the stock game, with placeables files identified with the PLC_ prefix, then I have a short code for the given project I am working on (in this case I chose var_), then something identifying the object (food), and finally a numerical suffix (_02 in this case) as there will likely be more than one "food" item in the project. Altogether that means the files for the Kiwano will be named plc_var_food_02, plus any suffixes needed like identifying a tintmap with the _t (so plc_var_food_02_t for the tintmap for the Kiwano).

A word on filetypes and image sizes: While not strictly necessary, NWN2 prefers .dds files for textures. The Kiwano textures came in .jpg, so I used an image editing program to save them with the new filename, and also reduce the image resolution size. Sketchfab files generally include very large texture sizes. NWN2 generally uses 512x512 or 1024x1024 image sizes. Our Kiwano is a small object, so I went with 512x512.

Since there was no tintmap, I've created a basic one by making a copy of the image and then just painting it red.


Now to work with the object itself. In blender, import the object. Our Kiwano happens to be in .obj format.


And there it is. However, the object is far too complicated for NWN2 to deal with. Even feature objects should be 10k or less polygons. Small objects like our Kiwano will be are much less.


Fortunately, Blender can take care of that for us with the Decimate modifier ( https://docs.blender.org/manual/en/latest/modeling/modifiers/generate/decimate.html)


Sketchfab objects are normally much, much greater complexity than we want for NWN2, so we are going to decimate by a lot. In this case I've selected to keep only 2% of the polygons of the original.


For the rest of the process, I prefer to use gmax. You can do all the gmax things I am going to talk about in Part 2 of this tutorial in Blender if you prefer. Time to export from Blender so I can work with it in gmax.


One thing I've found is that Blender doesn't seem to like exporting to .MDB after doing a decimate. It produces a 1kb file. I have found that I often need to export the object to the original format, then open a new file and import the object I just exported, then export to .mdb.