Saturday, November 14, 2020

Adding a tintmap to an object

One thing I missed in my tutorial on importing an object into NWN2 is how to add a tintmap and/or normal map.

Since it was requested to be able to make the White Tower from https://neverwintervault.org/project/nwn2/hakpak/original-hakpak/white-tower-nwn2 tintable, I am going to be using that as my example. The download itself comes as a .hak file, so I have NWN2Packer to used unpack the hak into the component files. You can get it from https://neverwintervault.org/project/nwn2/other/tool/nwn2packer-v19

This tutorial assumes you already have either Gmax or Blender installed with the plugins for nwn2 files, see part 1 of my post on importing models here for information on that: http://kamalpoe.blogspot.com/2019/09/nwn2-importing-3d-model-into-game-part-1.html  I prefer gmax, but Blender is more powerful, still supported, and generally much more advanced, so if you are new to all this that's the way to go. While this tutorial shows Gmax, Blender is able to do everything shown here (and more).


Here, I've opened PLC_BC_WTBASE1.MDB in gmax, and opened up the Material Navigator (the button under the mouse icon), you can see the Material Navigator window at bottom left.


There are a number of parts that make up each model ingame, you can see the tutorial on importing for an explanation of them. Since I don't need to work with the collision boxes and walkmesh, I am going to hide them to make it easier to select the pieces of this model, via selecting them, then right-clicking and selecting the "Hide Selection" option


As you can see from the Material Navigator, this model has a lot of parts, and each part has it's own Diffuse and Bump textures, and one has a Self-Illumination texture as well. The Diffuse texture is the basic texture of the model, the Bump is also called the normal map, and provides simulated detail into the model without needing to make a more complicated model. Self-Illumination is glowing parts. Each of these parts will need to have a tintmap applied to it.

By double clicking on the part, I have opened the Material Editor, which allows me to specify the textures used for each piece of the model (as well as some more advanced things like glossiness and inbuilt coloring that are not part of this tutorial, but are shown in the default Material Editor window). Click the Maps option in the Material Editor to open up the actual texture list. 


We've got the list of textures the part uses open. There are a lot of options, but NWN2 can only use four of them. The Diffuse (our basic texture), the Self Illumination (glow), Filter Color (the Tintmap!), and Bump (the normal map). Technically only the Diffuse is needed. If a box is unchecked it will not be used even if there is a texture specified.


Click on "None" in the Filter row of the Map column, and the Material Navigator window will open. 


Then select Bitmap, and click the Open button.


A quick word on naming conventions. Here are the texture files for the columns and railings. As you can see the normal map filename is the same basic name but ends with _n and the tintmap ends with _t. While not technically necessary, this is the naming scheme used by the stock game, and it makes it much easier to work with the textures for an object when they are all named according to convention. The easiest way to make the tintmap files is just to make a copy of the basic file, such as PLC_BC_WTCOLUMN, and then give it the _t suffix. If there's a lot a batch renaming program like Renamer (https://www.den4b.com/products/renamer) can do the work for you. Once you have the tintmaps, in Paint or whatever graphics program you prefer, set the coloration to some combination of red, green, and blue. I've used solid colors here but you can blend and mix. These colors determine which tint colors get used in the game as color 1-3 respectively. I just randomly did solid red, green, blue for this tutorial. 


Find the tintmap you want, and select Open. It will be applied to the object when you do this.

The texture we picked will now be listed in the main Material Navigator window. We did it!


Repeat this for every part of the object that has texture files on it. In this case that's a lot of parts, but many objects are simpler and will use only a single texture. You can open the texture options for each piece of the model by double-clicking on it in the Material Navigator. Not that the Self Illumination is much stronger than the tint, so if you tint something like a glowing window, the glowing part is much stronger and the tinting hardly visible ingame. You can of course edit the Self Illumination texture to what you want if needed.


When you're done, export it via File-> Export to wherever you are saving things. Save it as the same filename as what you imported. For this example that was PLC_BC_WTBASE1. Put the model file and the textures somewhere your module can see them such as the campaign folder or hak.


Now try it out ingame and see if you can tint it. Yeah, it's ingame!


Ok, so those are some ugly colors, but they are highly visible for this example.


Wednesday, September 11, 2019

NWN2: Importing a 3d model into the game: Part 3

So in Part 1 and Part 2 we converted a small object for placing ingame. What about an object where we want to allow creatures to walk on it, like the balconies of the stock game. We are going to add a walkmesh to the object. The walkmesh is not a required file for placeable objects (many stock game tables do not have them as an example).

A walkmesh tells the game very specifically where the player and creatures can and cant walk. I've made a copy of one of the stock game balconies to work with here. Here it is in gmax, it's object PLC_MC_BALCONY13.mdb.


Well we already have our object from Parts 1 and 2. so let's stop looking at everything that's not walkmesh and just focus on that for now. The picture below shows the important parts of the walkmesh. The model part must end in _w, NWN2 requires this. We've selected one polygon at left and under the surface properties at right we can see that the material is set so the game knows you can walk there, and also what footstep sound to make. Also, you can see the walkable part is marked with a different color than the non-walkable in gmax.


Here's an example walkmesh for download and import to use:  https://www.dropbox.com/s/uydar353lxggkp2/walkmesh_example.7z
It's a very basic square of "no walking here". You can import it into your kiwano model from Part 1 and 2 if you want.

More complicated shapes, such as the balcony, require more polygons in your walkmesh than I have included in my basic example, but the basic idea is the same. You will need to add polygons to get a shape you want.

Very basically, here is how you can do that in gmax.


Then add your triangle point by clicking somewhere


Then close the triangle, it's always triangles for this.


If you want that part to be walkable, select the triangle or triangles and set the triangles to a material ID telling the game you can walk there. For stairs or non-flat walking, adjust the triangles as needed. See the first screenshots from the balcony walkmesh for an example.


Once you're done, export the object and test it out ingame (remember to bake the area so it uses the walkmesh you just made).

NWN2: Importing a 3d model into the game: Part 2

In Part 1 (http://kamalpoe.blogspot.com/2019/09/nwn2-importing-3d-model-into-game-part-1.html ) we downloaded and converted an object from sktechfab into the .mdb format Neverwinter Nights 2 uses and converted our texture files to .dds. Now to make adjustments to the file and get it into the game.

As I said at the end of the previous part, for the rest of the process, I prefer to use gmax. You can do all the gmax things I am going to talk about in Part 2 of this tutorial in Blender if you prefer.

In gmax, select file -> import, and select the .mdb file we exported at the end of the previous part. I've also open the Material Navigator pane so we can see the textures assigned. As you can see, Blender left an extraneous triangle object in there, we can select it and delete it.


Remember from the past part where I said the model parts must be uniquely named, below is where you can do it in gmax, select the model (this model has only one part) and give it a unique name. Since the final object is going to be named PLC_var_food_02.mdb, I am going to name this model part PLC_var_food_02.


In the picture below, you can see I've named my model part, then used the Material Navigator to open the Material Editor pane. This pane is where we select the textures that will be applied to the model. Of the possible textures that can be applied, NWN2 can only use the Diffuse (this is the main texture), Self-Illumination (not needed, used if you want the object to glow), Filter (this is the tintmap), and Bump (this is the normal map). The rest are not used by the NWN2 game engine.


As we select the textures, the preview window shows them applied to the model. Your modelling program (whether gmax or Blender) knows how to wrap the texture around the object, as this information is included in the model file we downloaded. For purposes of this tutorial, no need to think about how it does it.


Note that how our Kiwano is oriented to the crossing lines in the viewports is how it's going to be centered ingame relative to the cursor when you try to place the object ingame. I'm not going to worry about that right now, let's just get the model ingame. Select File->Export and export it somewhere for the game to use and in the mdb format. I'm just using the Override folder here.

I've previously covered the 2da and blueprint editing process here:  https://kamalpoe.blogspot.com/2016/02/nwn2-basic-placeable-reskinning-tutorial.html It's exactly the same. Once that's done, copy the new model and textures into an area the game will use. For this tutorial I am just using an empty override and a test module.

If you're already familiar with placeables, you might have realized I left out some things, don't worry, that's on purpose for this tutorial.

As you can see below, I've placed our kiwano ingame, with a stock human for scale. It's obviously way larger than I want, and also I can walk right through it! Let's fix that.


First, in the toolset, scale down your kiwano to the size you want it to actually be. Let's say 0.05, 0.05, 0.05 for our kiwano. Ok, now that it's the size you want your default kiwano to be, let's go back to gmax and make the kiwano that size.

Right click on the object and select scale.


Next, select Tools ->Transformation type. Since you have already selected you are working with scale above, you get the Scale Transformation Type-In. While the NWN2 toolset uses a scale of 1 as default, gmax uses 100 as the default. So if you set your object in the toolset to 0.05 scale to get it scaled the way you want, you multiply that 0.05 times the 100 scale gmax uses, for a scale to enter in gmax of 5 for each dimension.


You can export your kiwano again, and when you place the object in NWN2 it should already be the size you want. But you can still walk through it.... Not really a problem for something meant to be a small fruit, but if you were putting a large statue ingame that's a problem.

Enter... the collision mesh. This is a model part that tells the game engine there is an object there, so creatures can't enter the space occupied by it. More about them is here: https://nwn2.fandom.com/wiki/MDB_Format  Anyway, you need one, and I've put an example one here:  https://www.dropbox.com/s/6z9bkdb66gy8yal/collision_mesh_for_tutorial.7z that you can download and use as an example. The example one is sized for a plate of pie. It's easier to import one than build a whole new one each time you need one.

You can also export a collision mesh from an existing object by opening the object in gmax, selecting the collision mesh, and then selecting File->Export Selected, this will export just what you've selected, not the entire object.

With your kiwano already open in gmax, select File -> Import and import your collision mesh. It doesn't replace the kiwano, just adds the new mesh object. Since my demo collision was from a pie, it's named based on that, change the name to the object you are working with, but it must have the _C3 or _C2 suffix (see the MDB documentation above for what the difference is). You need at least one of the two collision meshes.


As you can see, it doesn't fit our kiwano very well, we need to fix that. Right click the collision box and select move, then select modify (under the arrow in the screenshot below) and the dots (highlighted in yellow below).


Select the dots in the viewbox, and move them around to better fir your object. Once you have a decent fit, you can export your object again and it's ready for game use. File->Export.


Our kiwano is small, too small to really affect the walmesh. What about larger objects? Part 3: adding a walkmesh.

NWN2: Importing a 3d model into the game: Part 1

For purposes of this tutorial I am going to use a 3d model from https://sketchfab.com. Sketchfab has lots of high quality models, often made from scanning real world objects, and the models they allow to be downloaded often use Creative Commons licensing. Their search function has a checkbox to restrict to downloadable models.

Specifically for this tutorial, I am using the Kiwano fruit from https://sketchfab.com/3d-models/kiwano-horned-melon-6ce07b8b2e654cde80eb5275842e5fe5

This tutorial assumes you have Blender, with the nwn2 .mdb import export scripts provided by rjshae from https://neverwintervault.org/project/nwn2/other/tool/blender-mdb-importexport-plugin . I personally also use gmax for fine tuning, so this tutorial will show that, but in principle the entire process can be done in Blender. gmax can be officially downloaded from https://www.turbosquid.com/gmax . To use gmax you will need the NWMax scripts from https://neverwintervault.org/project/nwn1/other/tool/nwmax-8. The download says it's for NWN1 but it works just fine for NWN2 as well.

Download the model. We always want to select the "original format", as the "autoconverted format" option produces a file in a format Blender and gmax can't handle. .obj and .fbx formats seem to be common, and those are good, Blender handles them without issues. Save your files somewhere. One peculiarity I've found is that the zip file you download often contains a zip file inside it with the model itself. This is the case with our example Kiwano, so you will need to extract the contents of that inside zip file.


We've extracted the contents now, here's what our folder looks like after I've placed all the files from the download into one folder for ease of use. There are two primary things to note here, the first is that there are more texture files than NWN2 can use. You will need the primary texture, and a normal map, plus a tintmap and a glowmap if you want tinting and for the object to glow, respectively.


Our Kiwano has both the main texture (highlighted in the image above, and a normal map included, the rest of the image files are files that NWN2 can't handle, so they can be deleted.

A word on filenames: Filenames need to be unique, otherwise NWN2 won't know for sure which file to use, and will just choose one. This will cause problems of course. I use the general naming convention of the stock game, with placeables files identified with the PLC_ prefix, then I have a short code for the given project I am working on (in this case I chose var_), then something identifying the object (food), and finally a numerical suffix (_02 in this case) as there will likely be more than one "food" item in the project. Altogether that means the files for the Kiwano will be named plc_var_food_02, plus any suffixes needed like identifying a tintmap with the _t (so plc_var_food_02_t for the tintmap for the Kiwano).

A word on filetypes and image sizes: While not strictly necessary, NWN2 prefers .dds files for textures. The Kiwano textures came in .jpg, so I used an image editing program to save them with the new filename, and also reduce the image resolution size. Sketchfab files generally include very large texture sizes. NWN2 generally uses 512x512 or 1024x1024 image sizes. Our Kiwano is a small object, so I went with 512x512.

Since there was no tintmap, I've created a basic one by making a copy of the image and then just painting it red.


Now to work with the object itself. In blender, import the object. Our Kiwano happens to be in .obj format.


And there it is. However, the object is far too complicated for NWN2 to deal with. Even feature objects should be 10k or less polygons. Small objects like our Kiwano will be are much less.


Fortunately, Blender can take care of that for us with the Decimate modifier ( https://docs.blender.org/manual/en/latest/modeling/modifiers/generate/decimate.html)


Sketchfab objects are normally much, much greater complexity than we want for NWN2, so we are going to decimate by a lot. In this case I've selected to keep only 2% of the polygons of the original.


For the rest of the process, I prefer to use gmax. You can do all the gmax things I am going to talk about in Part 2 of this tutorial in Blender if you prefer. Time to export from Blender so I can work with it in gmax.


One thing I've found is that Blender doesn't seem to like exporting to .MDB after doing a decimate. It produces a 1kb file. I have found that I often need to export the object to the original format, then open a new file and import the object I just exported, then export to .mdb.

Saturday, March 10, 2018

Howto: Tanita's Terracoppa

Once the plugin has been downloaded the .dll file must be extracted, if it isn't already, and placed in the Neverwinter Nights 2\NWN2Toolset\Plugins directory. Once the new plugin is copied you must change the settings in the toolset to allow the plugin to be loaded. Run the toolset and change the options by selecting the View - Options menu. Change the AllowPlugins dropdown until it reads "Load all plugins" and click OK. This only needs to be done the first time that a plugin is installed. You will need to exit the toolset and rerun it for the changes to take effect. Once you are back in the toolset there will be a new menu item in the Plugins menu.

Now, on to actually using it.

Open the area you want to copy from:


Open your destination area. I made a blank area for demonstration purposes. The origin and target areas need to both be open for Terracoppa.


Select Terracoppa from the Plugins toolbar.


Terracoppa opens, select your source and destination areas in the drop downs.


Drag your mouse over the section of the source area you want in the Terracoppa plugin. This works via the area grid lines (you can turn these on for the area to help with your selection if needed). Note that you do not need to select the entire area.


Now move over to your destination area, the yellow box represents where Terracoppa will place what it's copying, move this around to where you want it to be in the destination area.


There are checkboxes for what you want to copy over to the destination, you can leave out creatures, or effects, or trees for instance. When you're ready, click the "copy and rotate" button. If you don't want to dont anything and close the plugin, click "get me out!" and the plugin will close.

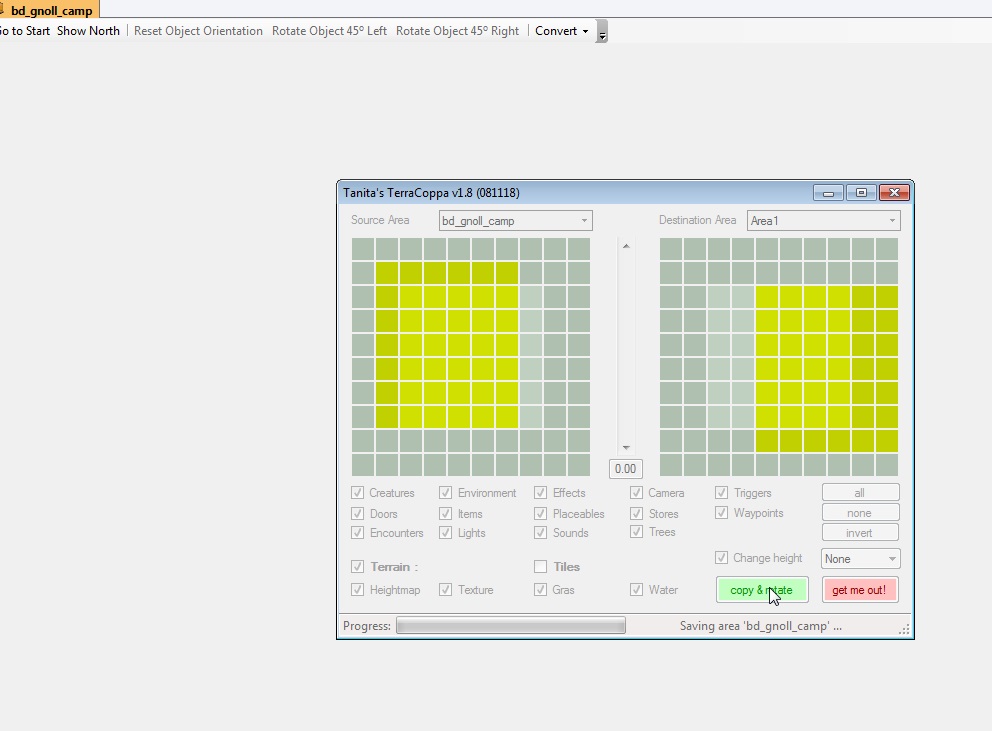
Pictured below is what Terracoppa looks like after you've clicked the "copy and rotate" button, while Terracoppa is running. Your toolset will be unresponsive while Terracoppa does it's work, and the source area will automatically be closed during the process.


Congratulations, Terracoppa has finished. Click the "Get Me Out" button or close the window.


You may need to zoom out to see the results. Shown below is the results from my example, the section of the gnoll camp area has been copied into the "area 1" destination area.


Sunday, September 3, 2017

Custom exterior textures in nwn2

From http://gameofthrones.net/resources/56-manuals-and-guides/661-nwn2-custom-texture-guide.html
A few notes to clarify things a bit.

It wasn't clear in step four since there are a lot of mask choices, but you want to add a black (full transparency) mask just like in step 2.
Once you have your files working the way you want, save them as .dds files, this will reduce file size to roughly 1/4 of the tgs file size. DDS is also the format of the stock game exterior textures, so it's possible there is some optimization hardcoded we don't know about. Paint.net works fine for converting to dds using the stock settings of conversion when you select save as.
Textures that are not square work fine.

MODDER'S NWN2 CUSTOM TEXTURE GUIDE

Resources Manuals and Guides
Thursday, 07 April 2011 15:28
This tutorial describes one method of creating terrain textures for NWN2. It may not be the best or most complete way, but it works quite nicely. This method also removes the glossy shine from textures for a more realistic appearance. You will need to download the NormalMap plug-in for GIMP and install it in order to use this tutorial.
For each texture, there needs to be three .TGA files:
  1. Primary Diffuse + Layer Mask (TT_MyTexture)
    Diffuse used with Terrain Normal Mapping turned OFF in game/toolset, Alpha used to control strength and location of 'fake' specular highlights
  2. Secondary Diffuse + Layer Mask (TT_MyTexture_c)
    Diffuse used when Normal Mapping is turned ON in game/toolset, Alpha channel does nothing
  3. Normal Map WITHOUT Alpha Channel (TT_MyTexture_n)
    Alpha channel used to control Strength of Normal Map specular Highlights only, Normal Map Highlight and Shadow location and Shadows Strength are unaffected

STEP 1:

Select a .BMP image scaled to 64x64 pixels in size. Make a copy of the texture you're working with, then resize the image in GIMP to 64x64 pixels. In GIMP, go to "Image" then go to "Scale Image". To resize the image, click the small button behind the number field (looks sort of like a broken chain link). Type in the new size, then hit "ok". Put the 64x64 .BMP image into your Program Files/Neverwinter Nights 2/NWN2Toolset/Terrain folder.

STEP 2:

Make another copy of the original image. Scale this texture image to a multiple of 8; 512x512 is the standard texture size in NWN2, but you can use 1024x1024 if you require a crisper texture.
A larger texture will consumer more memory, and in the case of 1024x1024, it will use the space of FOUR 512x512 textures, so choose wisely.
Click on "Layer", then "Mask". Select "Add Layer Mask...". Now, click on "Black (full transparency). Click the "Add" button. Next, go to "Layer", then "Mask", and click "Apply Layer Mask". Now, save the image as .TGA (example: TT_MyTexture).

STEP 3:

Open the image file that has the layer mask that we were just working with. Save it as, for example, TT_MyTexture_c. This file must have the "_c" at the end of it to work properly.

STEP 4:

Open the image that you first scaled to multiples of 8 (the picture with the actual terrain image). Next, go to "Filters" tab, go down to "Map", then "Normalmap...". Where it says "Filter" in the Normalmap box, choose your filter type (ie 5x5), then hit "Ok". Now, click "Layer", then "Mask", then "Add Layer Mask". Now click "Layer", "Mask", then "Apply Layer Mask". Save this file as, for example, TT_MyTexture_n. This file must have the "_n" at the end of it to work properly.

STEP 5:

Edit terrainmaterials.2da. Find a blank row at the end of the .2da file and input the basic name of your texture. Example: TT_MyTexture. Set each to a value of 255, then select for the last entry, the terrain type that most resembles the new texture. If you have a grassy texture, type in "Grass".

STEP 6:

Put the terrainmaterials.2da and the three .TGA files into your My Documents/Neverwinter Nights 2/Override folder or your Campaign folder. Fire up the toolset, then start painting the textures down.

IMPORTANT NOTE:

The textures should be as close to square as possible. If they are not, dark lines will appear around the texture when painted down. And if you prefer to have shiny textures, just don't add the masks described in the tutorial.

Saturday, January 14, 2017

Bedine released

If you've ever wanted to be (my version of) a Bedine tribesman in (my version of ) the Anauroch, now you can be. :-)
NWVault or at the Nexus

A campaign for first level players. Note: You will have all your equipment destroyed on entry, and will have the opportunity to pick up Bedine appropriate equipment. 

Bedine characters do not get any feats automatically, but can select among all feats available to the class as if they are bonus feats, allowing for more flexibility in builds. Thus, fighters do not get any armor or weapon proficiencies automatically at level 1, but can select those feats from their feat pools. In the archetype system, characters get the same number of feats as they would otherwise have. Remember to select at least one weapon feat or you're going to be stuck hitting things with your hands.

Bedine has Storm of Zehir style party generation options, as well as lore appropriate cohorts being available.

Monday, October 17, 2016

Closing in on release

With the exception of some minor bugs I'm aware of, Bedine is all tested ingame.

There's still some conversations to write as they are placeholders, some of the OM location objects and a quest boss for instance. And I'd like to include some bard type npcs to let the player hear stories and music tracks similar to how I did it in Crimmor.

Then I need to do some file trimming, as otherwise the download is going to be bigger than I'd like. There's a lot of custom content, but I didn't keep good track of just what I actually used versus what's in the folders but doesn't actually get used.

Sunday, September 18, 2016

Hand placing custom items is time consuming

Make all the custom items, given them some backstory/lore bits the players can read. Place them ingame in areas/positions where they make sense.

Some of the official expansions had trouble with this, as the game includes specifically named items that when examined have no backstory, just 'item does not bear the marks of any particular maker'. Umm, it's a item given an individual name, not just dagger +1 or even a 'sword of parrying'. My guess is the dev ran out of time and dev zots before release.

The backstory of a unique item is an extra bonus to the player though. Mechanically it doesn't do anything, but it gives the player connection with the gameworld and feeds the player who is interested in lore, discovery, and exploration. It helps roleplay, the player and thus the character can become invested in the item.

In Bedine I made four custom magic items for each of the Bedine traditional gear (armor and weapons), two each of +1 and two of +2, there are two of each so a player can have some item choice at each + level. Some of them are basic +1 with a story, others have other powers in addition to their + level. But all have associate lore. For example the scimitar Tawahhaj, it's not particularly powerful, a +1 scimitar with unlimited use of the Flare spell (which is near useless in default nwn2), but here is it's description:

Tawahhaj is the name given to this scimitar, but it is really the name of the tiny scarab wasa-ey that lives in a hole in the pommel. Tawahhaj the scimitar itself is unremarkable other than the hole in the pommel, Tawahhaj the wasa-ey transfers it's power to the scimitar. Tawahhaj the wasa-ey does not speak or otherwise communicate with the person carrying the scimitar. The wielder of the scimitar does generally offer bits of food to Tawahhaj out of recognition of it's power, but it is not clear if Tawahhaj eats them or not, or even needs to.

 Hopefully that sounds cool. It tries to invest a simple +1 weapon with a very minor extra ability with a reward for the player of coolness and gameworld lore.

Sunday, August 14, 2016

Bedine Update

Since that last post I fixed almost all of the bugs identified in the last playthrough, and have just finished up another test playthrough. This time I got almost to the end and got stopped by a walkmesh issue (transitioning to an area with a complicated walkmesh), so I made it maybe 90% of the way through the main path. I'd guess about 20 hours of gameplay if you do everything I think.

[counts up screenshots I took of bugs...] About 50 bugs or so from this playthrough. Some are basic things like typos, some are stopping some sidequests or are related to the custom class/feat work. This test was more focused on the main plot though, so four larger sidequest areas didn't get any testing as I wanted to check how combat balance would be if the player was main quest focused. Combat balance was somewhat improved with this playthrough, needs further tweaking, I ran into a couple of spots where I needed to break out the testers dagger of doom.

Saturday, July 2, 2016

Bedine Progress Update

There hasn't been a tremendous amount of work done on Bedine as I've started a new job in real life and it has a time and brain power consuming. There is some other real life stuff as well. That does not mean there is no news however, there is good news. I have completed a full playthrough (in sections, testing and fixing as I went) of Bedine through the ending dialog. So the campaign is now runnable from beginning to end without running into a gamebreaking bug.

That doesn't necessarily mean there aren't any gamebreakers hiding in there, just that the game is complete-able. Also, the final showdown with the big bad isn't written beyond "placeholder", but the confrontation starts properly and the epilogue begins properly when you defeat the big bad.

So that's really good. And since I've been fixing bugs along the way as I played through various sections, things are in pretty good shape. Playing through I see where some things need to be more fleshed out, but that work is going to be just in adding conversation and other bits to expand the players immersion in the gameworld and make things more coherent. Some potential companions require some "systems" work to get working ingame, but if that's too much I can just not make them available as companions, and I have the systems working in a test module for testing that specific thing.

I've reached a point where I want to shove Bedine out the door because new ideas are always shinier than old ones (cough, thinking about Crimmor when trying to finish Path of Evil for instance, cough). I know I should take the time to get it properly fleshed out.

Friday, May 27, 2016

Bedine Progress Report

I've got my testing completed up to the pont where you go to the "endgame" areas. The testing was slowed down by my discovering and needing to fix some issues with a tileset. Some of the things that worked in my test module did not work in the real module, and some of the things like module transitioning could only be tested in the real module. I tested the sidequests long enough ago I need to test them again to mark them off on my checklist in case something broke between then and now. At least I do expect them to work right.

As I've gone I've cleaned up various placeholding things like journal entries that just identified the journal state as opposed to providing proper journal entries. I've also smoothed out a number of conversations so they flow much better than they did.

My testing has identified a number of spots that I need to add some content to. Finding that sort of thing is something I expected based on my previous campaigns, so it's not really a surprise. An example would be something like a town where the only thing of interest was the local priest. It needs some more life to it, otherwise it winds up like the various towns of Storm of Zehir that exist only as taverns.

Wednesday, May 4, 2016

Placeables Galore

Release of my Tileset Construction Kit and Placeables packs. Over a thousand new placeables ready for use.

Beginning with separating pieces from tilesets for use as individual placeables, I also broke out pieces of existing placeables that didn't exist as separate placeables in order to use them as separate placeables. Also included are natural material walls made from the Walls of the Faithless, Wall of the Faithless statues with more useful textures (stone/ice in case of medusa/white dragon), hanging flowery plants (reskin of soz vines/roots) to brighten up your areas.

By blueprint count, there are 800 placeables in the pack. I use original textures where possible to save on pack size. This pack includes my previously released natural glowy stuff pack.

Tileset Construction Kit: http://neverwintervault.org/project/nwn2/hakpak/kamals-tileset-construction-kit

Placeables Pack: http://neverwintervault.org/project/nwn2/model/kamals-placeables-pack

Thursday, February 25, 2016

NWN2 Basic Placeable Reskinning Tutorial

This tutorial assumes you have mdbcloner (http://neverwintervault.net/project/nwn2/other/tool/mdb-cloner)..


Step 1: Find the original game models you want to work with, you can look that up in the  placeables.2da (View -> 2da file in the toolset menu). To find it, the properties for the placeable tells you what to look for, the Appearance property (highlighted) lists CityBEstate2 for my example (one of the estate buildings), I can then do a search in the placeables 2da for CityBEstate2


No need to know what all the columns of the 2da do at this point, just look at the  NWN2_ModelName column for the placeable you plan on reskinning. For the example that's PLC_BC_ESTATE02. You can search for this model name (PLC_BC_ESTATE02.mdb) in your game installation

 Copy this model somewhere safe to work with. Some placeable models have numerous individual parts and would have to be reskinned in a modelling program such as gmax, as each part must have it's texture changed, but let's focus on something that can just be cloned.

step 2: open the model in mdbcloner. This will let you see what textures are used for the placeable. Find those in your install and make a copy somewhere safe. You're going to be editing the copy for the reskinning. MDBCloner looks something like this when it has a model open, in this case it's a mindflayer, but it will show the same basic information for any particular model.


MDB Name: This is the name of the model. To make a copy of your model, change the name and click the Save Clone button. Congratulations, you've made a copy of your base model. You probably want to change the textures though, so select some different textures and then click Save Clone again.

Below I've picked my new model name and textures to use. I hit the "Save Clone" button and MDBCLoner will save my new model to the location specified in the Output folder. It does not prompt to save, or warn about potentially overwriting a file, it just does it.


Diffuse: This is the basic texture. You will need an image editing program to make whatever changes you want to the texture. How the texture wraps around the placeable varies by model, and is beyond this tutorial. You may want to experiment by drawing a bright colored lines on your texture and seeing how they show up ingame. Note that if you make a portion of the image clear, you can functionally erase that part of the model.

For the next three  textures, think of them as overlapping the Diffuse texture. For example the claws of your creature are represented in the same portion of the texture on all of the textures (bottom right corner for instance).
Tint: The tintmap of the object, this image file gets interpreted to apply tinting to the creature. If you want part of the creature to be tinted by the first channel property, color that part of the tintmap red. Blue and green are the other two channels.  You are not limited to pure red/blue/green, If the tint is purple the tint to be applied is a combination of red and blue channels. One way to make an intricate tintmap is to make a copy of the base texture, and adjust the hue/saturation in your image editing program until it is very strongly colored. The tintmap must end with the _t suffix. This texture is not necessary unless you wish the object to be tintable.
Glow: If you want your object to glow in the dark, you'll need one of these. Must end with the _i suffix. This texture is not necessary and not used for most objects.
Normal: This texture controls the "bumpiness" of the texture, it's a visual trick to make you think there is depth where there isn't any. It must end with the _n suffix. Most programs will let you make a normal map from your diffuse map. To make one in GIMP, open your diffuse map and select filters -> maps -> normal map. The "scale" controls just how bumpy you want things to be. The normal map can be that peculiar shade shown below, or mostly clear or just about anything else. Don't worry, the game knows what to do with it.


While it's technically not necessary, I advise making the texture names the same as the model name, plus the relevant suffixes. This makes things easier to figure out. If you're not making significant changes, you may opt to just use the original normal map for any reskin, to save file space. Not my preference though.


Ok, we've made our clone, now to put it ingame.

Copy the model made by mdbcloner, and any textures you used, to your campaign/module/hak and load the campaign/module up in the toolset. Open up your placeables 2da and find the row of your base model. Copy that row to an empty row. If you plan of releasing your work publicly, please reserve the row you chose on the 2da reservation wiki (http://nwn2.wikia.com/wiki/Reserved_2da_ranges) Copying the row will give it all the basic properties the original has (such as whether it blocks line of sight), which you probably want anyway. If you really want to know what those columns mean, you can refer to http://gameofthrones.net/resources/57-technical-documentation/437-placeables2da.html

There's two columns you need to be aware of in the placeables.2da to get your model ingame.


The Label column is what it will be listed as under the Appearance property of the object. So let's enter something you will recognize, for example Estate_House_Alternate, or Banner_Bandits or whatever.

The NWN2_ModelName column tells the game what model it should use for that appearance. If you named your model Estate_Alternate, that goes in that column, the .mdb file extension is not needed.

Click the save button under the placeables.2da, next to add row/delete row in the screenshot above. If you just close the 2da, it will not save things automatically. Your changed copy of the 2da is saved to the Override folder. You will need to cut/copy it out of there into your campaign/hak etc. when you're ready to share your campaign with the world.

Ok, the game is now aware of your new model. Let's get it ingame.

You can take any object that exists already ingame, and go to the properties -> Appearance and select your Label from the dropdown (Estate_House_Alternate was what we used above as an example). That will change that existing object, but you probably want to make a new blueprint so you can easily place your new object. Right click a blueprint and select Copy Blueprint -> module or campaign (your choice).


Once you do that you can change the Appearance of the new blueprint to whatever you by going to the properties -> Appearance and select your Label from the dropdown.


You will likely also want to change the name and also the resource name, tag, and template. I normally change those to whatever I had named the model.


You should now be able to use this blueprint to put your reskinned placeable ingame.

If a texture for the reskinned model is not available to the game, it will display the placeable but with a bright texture that indicates it couldn't find the assigned texture.

One good thing is you can make texture changes quickly, just drop your new version of the changed texture file into your campaign/module, the new version will be used as soon as you change the "main variation" away and back to your chosen one.